|
ABOUT THE AUTHOR
The author, Drew Finn, is a Licensed Professional Engineer and a Licensed Home Inspector in MA and CT. He has been inspecting homes since the early 1980's, and is a member of the prestigious American Society of Home Inspectors (ASHI).
He has observed many problems in homes which could have been avoided had the owner known more of the home facts. The technical home facts section was written over the years as supplements to his home inspections to educate the buyer on specific deficiencies. With this information, the buyers have been able to make informed decisions.
All homes have deficiencies, even new ones. The question is, how serious are the deficiencies, and what will it take to correct them. Mr. Finn has seen people panic over deficiencies which could be easily corrected. Panic results when people do not understand the deficiency. He presents this information so that you may make informed decisions without fear. | ||||||||
|
INDEX | ||||||||
|
1 | ||||||||
|
SHINGLED ROOFS
1. Most shingled roofs will last 15 to 30 years. The variation depends on the initial quality of the shingles, and more importantly, on the type of installation. Shingles on steep-sloped roofs last longer than on less steep roofs. South side roofs wear more due to ultraviolet radiation from the sun. 2. Proper ventilation of the attic area will help extend the life of a roof and roof covering. Poorly ventilated roofs will overheat the shingles during summer months leading to cupping, brittleness, and premature aging. In the winter poorly ventilated roofs can accumulate moisture that can destroy the roofing material and the rafters. 3. Ventilation above the insulation is needed. Never, never cover the attic vents, winter or summer. Ventilation is accomplished when warm air rises; blockage at the top or bottom will choke off the ventilation. The most common blockage is at the lower end, with insulation stuffed up against the roof. Pre-formed corrugated styrene panels are often used to assure ventilation from the soffit area. 4. Most people replace the entire roof all at once. However, sometimes only a portion of the roof shingles require replacement.
| ||||||||||
|
LEAD PAINT
1. Much of the paint used prior to 1960 and some through 1978 contains lead. To determine if paint has lead, it must be tested.
2. Avoid Contact;: Harm from lead occurs when ingested or inhaled. Poisoning can occur anytime. When renovation or de-leading is being performed, care must be taken not to poison workers or the occupants. NEVER burn or sand lead paint to remove it.
3. Children are the most susceptible to lead poisoning. They pick up the lead paint dust on their hands and transfer it to their mouth. The paint does NOT have to be peeling or chipping to create a hazard. Operation of windows with lead paint is the most common source of lead paint dust generation and poisoning. Frequent washing of children's hands is always good practice.
4. Lead paint poisoning in children creates brain damage. Lead poisoned children have learning disabilities, and lower IQ's for life. As studies have shown, even low levels of lead creates problems; many states have lowered the permitted lead level in a child's blood. Children from all walks of life have had lead poisoning. The belief that only inner city children get poisoned is not true.
5. The safest way to avoid the danger of lead paint is to remove the material the paint is on or to cover it with wallboard or paneling. Proper cleanup is essential to avoid poisoning. Surfaces must be wiped with damp cloths, the cloths are then disposed of.
6. Testing for lead in paint can be performed at the house by analyzing chips of paint with chemicals and/or with an expensive radiation device. The chemical analysis has some accuracy problems giving false positives and false negatives. To obtain an accurate level of lead in the paint, a sample chip of paint can be analyzed in a lab. The radiation device is unlikely to give false readings, and gives an accurate reading as to the true level of lead in the paint.
7. For more information, contact your State Health Department. | ||||||||||
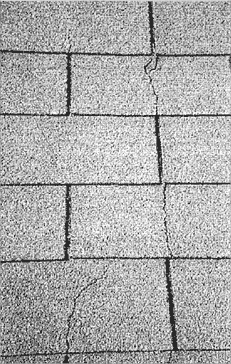 Cracked Shingles | ||||||||||
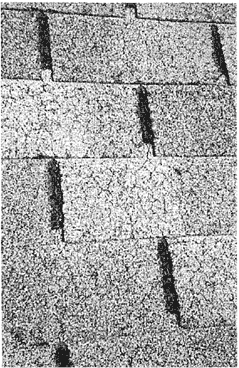 Worn Out Shingles | ||||||||||
|
2 | ||||||||||
3 | ||||||||||
|
AIR CONDITIONING & HEAT PUMPS (AC & HP)
Never: 1. Attempt to cool with an Air Conditioner (AC) or Heat Pump (HP) if the outside air temperature is below 65 degrees Fahrenheit. 2. Turn on the AC or HP unless there has been power to the unit for atleast 24 hours. 3. Cycle quickly between heating and cooling modes.
Maintenance: 1. Most systems are compressor type systems which have little maintenance that a homeowner can perform. However, removal of debris from around the outside coils, checking the insulation on the pipes, and changing the air filter(s) can be done by the home owner. 2. A service contractor should be called in case of inadequate performance. The cooling coils should cool the air at least 15 degrees Fahrenheit. Call for service if the system is not cooling properly or any peculiar noises are heard. Slow leaks in a system would make it necessary to occasionally recharge the system. 3. Evaporative water cooling systems, found in the dry, southwest United States, require winterization in the fall and activation in the spring. Periodic inspections are advised, especially after very hot weather or sand storms.
Notes: 1. The efficiency of a heat pump (HP) drops off as the heat sink (air, water, or soil) temperature drops. Below 40 degrees Fahrenheit, most manufacturers advise not to use the HP. This saves wear on the unit, extending its life. Some modern systems turn on the electric or the fossil fuel heaters, and turn off the HP at a preset low temperature. 2. Store mobile air conditioning units in the same orientation as they are when being used, not on their sides, back, top or front. | |||||||||||
|
AIR MOISTURE | |||||||||||
|
Much moisture can accumulate in the lowest level (basement, crawl space or slab on grade) of a house with no ground water leaking in. The moisture comes from the outside air.
Whenever air temperature drops below the dew point, water vapor in the moist air condenses. This is what causes rain. The ground temperature is cool (eg. below 60 degrees Fahrenheit). In a basement or a crawl space the temperature of the foundation is consequently low, thus moisture can condense from the air forming water droplets. If not avoided, this will lead to fungus growth (wood rot) and mold spore growth, see section on Mold for health concerns.
This problem will exist if the surface that the air comes in contact with is below the dew point.
The biggest misconception is opening the windows or crawl space vents during hot, humid weather. This practice causes much condensation, and can over time create structural failure of the house's base structure.
Recommendations during humid weather:
1. Dehumidify lowest levels (basement, crawl space, even first floor of slab on grade) 2. Close all vents on this level 3. If there is an open soil floor in basement or crawl space, cover with plastic
Note: The dew point is usually given in weather reports. The ground temperature is in the high 50s in the north, higher in the south but so too is the dew point typically. The dehumidifiers have humidstats so will run only when needed.
Helpful hints to avoid the chore of dumping the dehumidifier water:
1. Mount dehumidifiers up, and drain into a sink or trap 2. An alternate method is to use a condensation pump to pump the water out (the type used for air conditioners) | |||||||||||
| |||||||||||
|
4 | |||||||||||
|
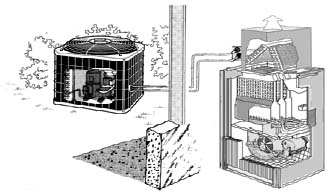
A/C Outside Unit and furnace inside | |||||||||||
|
REDUCING MONTHLY UTILITY BILLS
Appliances
High current devices which run frequently devour most of the appliance power used. The largest power users are the refrigerator and the hot water heater. The refrigerator should be kept between 38 and 42 deg. F, the freezer at 0 to 5 deg. F. If kept 10 degrees cooler, 25% more power will be used. The hot water heater should be set at 120 deg. F. For every 10 degrees hotter, 5% more power will be used (over 140 deg. F is a safety hazard).
Hot Water
Insulating a hot water tank can save you 15%; follow installation directions. A gas or oil fired unit must not be insulated on the top or near the burner air inlet.
Reducing water use and waste can save much money for you. Not running the water when brushing your teeth can save 15,000 gallons of water for a family of four over a year. Repairing that dripping faucet, at a rate of one drip per second, will save 2,400 gallons annually. That's enough for 160 dishwasher loads. A quick shower will use less than half the water a bath would use. Remember it's not just the water you are saving but also the money it costs you to heat the water. The energy saving shower heads use about half the water a standard head does.
Refrigerators
Cleaning the condenser coils on the refrigerator will reduce operating costs. A special brush to clean the coils located under the refrigerator is used, (Caution: unplug the appliance before cleaning). Some models have a switch to control condensation on the front of the door. This switch turns on small heaters to warm the door. Keep this turned off as much as possible especially during the winter when the humidity is low and thus little or no condensation will occur.
Energy Audits
In many areas, utilitiy company and/or state sponsored energy audits are available at low or no cost. They analyze your home and make recommendations on the "smartest" energy improvements; these are the improvements which will save the greatest amount of money in the shortest time. Contact your local utility company for more information. |
REDUCING MONTHLY UTILITY BILLS
Air Conditioning & Heat Pumps (AC & HP)
1. For Central Air Conditioning units an Energy Efficiency Rating (EER) of 10 is good, over 12 is excellent. 2. For Room Air Conditioning, an EER of 8 is good, over 10 is excellent. 3. Heat Pumps have Co-efficient of Performance( COP) ratings, the higher the better. Essentially they are the ratio of the amount of electric energy used to the energy out. At low temperature, the COP drops. As the COP approaches 1, it is wise to use back-up electric heat. This will save wear on the heat pump components. At 37 deg. F, a COP over 2 is good; at 47 deg. F, a COP over 3 is good. 4. Maintenance consists of keeping the coils clean by vacuuming the outside and inside coils as needed, and changing or cleaning most air filters every month. Some filters are electrostatic,and some are large HEPA filters which are checked or replaced as needed at the annual system cleaning.
Choosing a New Appliance
Energy Guide Labels are on all new refrigerators, freezers, water heaters, clothes washers, dishwashers and room air conditioners. These appliances are rated because they consume the most energy. The labels are bright yellow with black print. The label shows the estimated cost per year, or in the case of room air conditioners, the EER. The line below the number has a pointer indicating where this model falls relative to other models on the market.
For example, a refrigerator is expected to last about 20 years. If the more efficient model is an additional $90 and saves $30 per year, then over the 20 years you will save $600 by buying the more efficient model. Your $90 additional investment will save you $600.
Do Not Overseal A House
Certain house air leakages which appear to lose energy are intended to rid the house of moisture. Attic ventilation is a good example, NEVER COVER ATTIC VENTS. The resulting moisture can create major, costly structural damage. Another example are the weep holes in storm windows (usually small slits or notches at the base of the storm window) and certain non-sealed thermopane windows. If you are sealing for air infiltration, do not cover storm window weep holes. | |||||||||
|
| ||||||||||
|
6 |
7 | |||||||||
|
BASEMENT WATER
1. Over half the basements in the United States have some type of water problem. There are two primary sources of water problems. The water leaks in from the surface or comes from below the ground due to a high water table or underground springs.
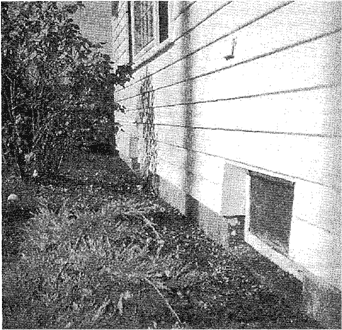
2. The most common water problem comes from surface water. The water flows off the roof or adjacent landscaping, and collects up against the foundation. Eventually, the water finds its way into the basement.
To correct the surface water problem one must prevent the water from approaching the foundation. If gutters are present, see that the downspouts turn at ground level and travel at least four feet from the house. The downspouts can be hidden underground to avoid a tripping problem and an eyesore. Recontouring or grading the yard around the house may be required.
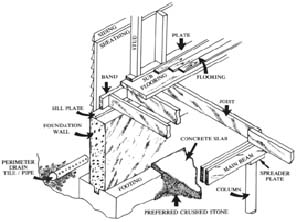
3. Another common water problem arises from the water under pressure pushing itself into the cellar. This type of water penetration is more difficult to stop than surface water. A trench or piping placed around the interior of the cellar and the use of a sump pump may be necessary. A proper perimeter (footing) drain installed during construction, see sketch page 15, generally eliminates subsurface water entry. A curtain drain around the exterior of the foundation may be added after construction (5 to 20 feet from the house) to drain the water away before it reaches the foundation.
4. The surest approach is to remove all the soil from around the foundation, add drains outside, seal the foundation, and provide positive surface drainage away when replacing soil. The drains should be drained to daylight if local codes allow this. Drained to daylight means draining on to the ground. If the drain is to a municipal storm drain, an appropriate check valve should be installed to avoid water backing up from the city storm drain into your basement.
5. Before you contract for basement water problem correction, be sure you understand what the company will and will not guarantee.
6. Mold can be present if water has entered the basement, see section on Mold for health concerns. | |||||||||||
Photos of yard drain poor | |||||||||||
|
Incorrect drainage; Slope yard to drain water positively away from the house, drop 6 inches over 8 feet | |||||||||||
9 | |||||||||||
|
8 | |||||||||||
|
PEELING PAINT
Moisture: 1. Most paint problems are caused by moisture. The moisture can come from either inside or, in some cases, from outside the house. The source of the moisture must be identified and corrected before the repainting will be effective. Other peeling paint problems originate from improper preparation. 2. One source of moisture is the bath area. Ventilating the bath with a fan to the outside, not into the attic or soffit area, helps to control moisture. Other sources of moisture include: humidifiers, dishwashers, showers and cooking. Often the use of a "vapor barrier" paint is recommended for inside the home to reduce moisture from penetrating walls, assuming no vapor barrier is present behind the wall. 3. Often the largest source of moisture is from the basement or crawl space. Covering open soil with polyethelene plastic will help. Sealing air leakage from the top floor areas (attic entry, around chimneys and other areas) with non-combustible material will reduce the tendency of the house to pull moist air from the ground. 4. Peeling paint on the lower several feet of the house sometimes is caused by rain run off splashing on the ground, deck or walkway. A rain gutter system will reduce this moisture loading. 5. Mold can be present with any elevated moisture presence; see section on Mold for health concerns.
Preparation: 1. Once the moisture problem is corrected, painting preparation begins. Loose paint must be removed, and the surface must be cleaned. (Note: caution must be taken if lead paint is present). 2. If mildew is present, it should be cleaned with detergent, scrubbed with a mixture of bleach and water (1 part bleach to 3 parts water), and then thoroughly rinsed. CAUTION: area MUST be well ventilated. Note: NEVER mix bleach with ammonia because a deadly vapor will be produced. 3. When painting the outside of the house, it is advisable to wash the entire house prior to painting. The wood must be thoroughly dry before painting. If commercial cleaning equipment is used, allow several weeks for drying.
Painting: 1. Bare wood should be painted with an oil or alkaloid primer. 2. Two top coats of paint are recommended. The second coat will generally double the life of the paint job. Do not exceed two weeks between primer and top coat application. 3. For more specific advice, consult your paint supply store. | |||||||||||
|
UNOCCUPIED HOMES/SECOND HOMES | |||||||||||
|
A second home or any home which is left unoccupied for more than several days is at risk. A power failure during freezing weather could lead to thousands of dollars in losses because of ruptured water pipes. The correct action to take when leaving a home unoccupied depends on the type of home. You are fortunate if the home seller is able to share his/her knowledge with you. Regardless, the following guidance is advised when leaving the house for more than several days: | |||||||||||
|
1. Turn the water off Summer and winter, when leaving the house for more than several days, turn the power off to a well and the main valve. For city/town water systems, turn off the main valve.
2. Monitor house Summer and winter have someone stop in to check the home at least weekly. During cold weather monitor more frequently and daily during very cold or stormy weather.
3. Security A low temperature sensor and a water sensor attached to an alarm system is advised.
4. Monitoring people Ask your neighbors for dependable people who monitor homes.
5. Heating A minimum of heat is advised in any house with a foundation. This is to avoid structural foundation damage caused by frost/freezing.
6. Winter use If the house will not be used for the winter, keep at minimum heat. Proper draining and flushing of the water system and fixtures will be needed. Hire an expert to winterize the house.
7. Freezing pipes If water is present in the pipes, leave the cabinet doors open below sinks. Note: insulating pipes will NOT prevent freezing; it only slows the process. Insulating between the pipe and outside wall is recommended, but heat from the interior must be able to get to the pipe to keep it warm. | |||||||||||
|
10 |
11 | ||||||||||
|
DECKS WOOD/STAIN
Wood Choice Pressure treated wood is the best choice for decay resistance. On the West Coast, builders commonly choose redwood and cedar, containing oils which naturally resist decay. These woods do resist rot for some time but will eventually decay. A common choice among East Coast builders is southern yellow pine pressure treated with chromated copper arsenate (CCA). This treated wood can be used in direct contact with the ground. It is advised not to place food on the wood, and to wear a mask when cutting the wood to avoid contact with the CCA.
Design to Minimize Decay The key to minimizing wood decay is construction design. The design should minimize the concentration of moisture by leaving gaps between wood, where possible, so that water will drain off. Another rule of thumb is to use little or no vertical exposure of the end grains of boards.
Deck Support/House Attachment 1. Supports must be on a firm base and below the frost line. 2. Lag bolting to the house is preferred. Attachment to the house structure, not just the siding, is required. 3. Flash from under the house siding to below the deck attachment. This is to prevent water from being trapped against the house and rotting the house structure. Water can cause serious structural damage to the house, and is fairly common. If the deck is already built and not flashed correctly, sealing between the deck and house can be very effective but does require maintenance every several years.
Staining Staining is preferred to painting completely exposed wood. A water stain with a pigment (color) and a preservative is recommended. All woods, even pressure treated lumber, need protection from the sun. The heavier the pigment (darker color) the better the protection. | |||||||||
|
UFFI & FOAM INSULATIONS
1. Urea-Formaldehyde Foam Insulation or UFFI, has been installed in over 500,000 homes in the United States.
2. The controversy over UFFI arises due to the formaldehyde the insulation gives off. Some people have an allergic reaction, including eye, nose and throat irritation. Some cases of insomnia, headaches, dizziness and fatigue have been attributed to formaldehyde. Also of concern is carcinogenic potential.
3. The highest levels of formaldehyde have been recorded in mobile homes. It is attributed to the greater quantity of plywood and other glued wood members, which also give off formaldehyde, used to build the homes. The following table, compliments of the Consumer Product Safety Commission, is given for reference. Concentration is measured in ppm's (parts per million).
Type of Home Formaldehyde Concentration Range Average Homes without UFFI <.01 to 0.08 .03 Homes with UFFI <.01 to 3.40 .12 Mobile Homes <.01 to 3.99 .34
4. In Massachusetts, UFFI has not been installed for almost 20 years, and consequently, the measured levels of formaldehyde in the air has dropped to very low levels.
URETHANE Urethane foams are the types that come in cans; They are good for sealing openings. The foam expands rapidly and can exert much force, distorting window & door frames, jamming the windows and doors.
ICYNENE Icynene is an excellent insulation; It is used to insulate walls, ceilings, basements and crawlspaces. Not only does it insulate, it seals: which stops air entry and greatly reduces noise. It actually seals so well that if your entire house is insulated with it, an air-to-air heat exchanger would be recommended to bring in air from the outside. Insulation is rated by R-values, the higher the better (see weatherization, pages 4 & 5). Heat loss also occurs from air loss (eg leaking windows). Since Icynene seals so well, if you insulate your house with Icynene insulation R=30, it would cost less to heat than if you insulated with fiberglass insulation R=30. | |||||||||
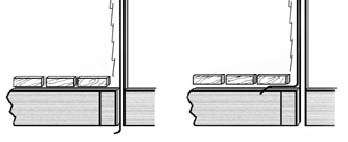
Diagram of flashing- Diagram of flashing-
13 | |||||||||
|
12 | |||||||||
|
ELECTRIC
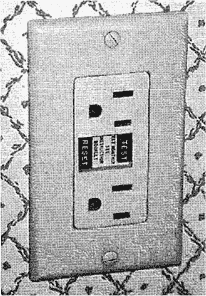
1. The wiring in homes is protected from over load with circuit breakers or fuses. If the breakers or fuses are the correct size for the particular wire, they protect the wires from becoming too hot. Hot wires can set a house on fire. Unfortunately, many houses have fuses which are too high a rating (amperage (AMP)) for the wire they are suppose to protect. 2. If you are unsure of the wire size, do not exceed 15 AMP fuses. We recommend that a qualified person check your house wiring to determine if the breakers or fuses are correctly sized. 3. Remember, if the fuse burns out, it is NOT because the fuse is too small; it is because the load on the line is too heavy. Do not increase the amperage of the fuse. Reduce the load on the circuit by placing some of the heavy current devices such as toasters, hair dryers and electric heaters on another circuit. If there are no practically located outlets to move these appliances to, then rewiring to break up the circuit will be needed. 4. If you have fuses, it is advisable to install special inserts which will accept only the correct size fuse. They are called Type S and also called Fustat. 5. All types of resettable circuit breakers require maintenance. At least once a year it is advisable to switch the breakers off and then on to prevent seizure, sometimes referred to as "freezing". 6. GFIC (Ground Fault Interrupt Circuits) are recommended in areas near water sources, such as bathrooms, kitchens, garages and the outdoors. New construction requires GFIC protection in these locations. Some GFIC breakers are built into the receptacles (they have test and reset buttons between the sets of receptacles), and others are located in the circuit breaker box. Both types of breakers should be tested, switched off and reset once per month to avoid seizure/failure. 7. If you are using an extension cord off a GFIC protected circuit, you may sometimes trip the circuit breaker. Try using a heavier duty or a shorter extension cord. 8. Federal Pacific manufactured CIRCUIT BREAKER PANELS, see photo on next page, are reported to be fire hazards, and should be replaced. Apparently these breakers fail to trip off when overloaded which can lead to fires. For more information search the internet for "Federal Pacific electric panel". | ||||||||||||||
| ||||||||||||||
|
GFCI outlet; trip monthly | ||||||||||||||
Circuit Breakers |
| |||||||||||||
|
Federal Pacific Panels | ||||||||||||||
| ||||||||||||||
14 |
15 | |||||||||||||
 Asbestos on pipes |
Asbestos1. Asbestos is hazardous when its fibers become airborne. Left undisturbed, asbestos is usually not a health problem. If you have a suspected asbestos source, do not disturb it. Under no circumstances should you try to remove it. The microscopic fibers will go through most shop respirators and into your lungs and contaminate the entire house. 2. Asbestos exposure increases the probability of contracting lung cancer or asbestosis (a lung disease). 3. Areas that are possible sources of asbestos include:
4. For a free booklet which will help you identify possible additional sources
of asbestos, call toll free: 5. For additional information contact: The Center For Environmental Management
|
||
 Drawing of asbestos on pipes |
|||
17 |
|||
 Encapsulated asbestos |
|||
16 |

| ||||||||||||
|
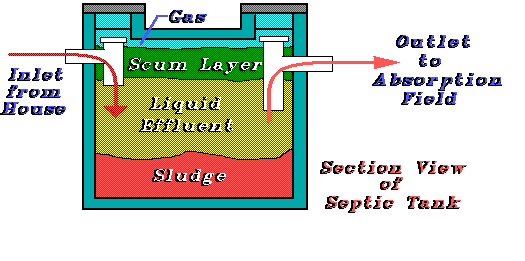
SEPTIC SYSTEM
1. Flush only toilet paper and human waste in your system. Never pour grease, oil, diapers or feminine toiletries into the system. Minimize the use of non-biodegradable detergents, avoid drain cleaners. 2. Never flush septic tank additives or chemicals (ones claiming to "help" the septic system) into the system. They may kill the bacteria or carry the trapped grease from the tank into the leaching area, leading to system failure. 3. The septic tank requires periodic cleaning (every 2 to 6 years), depending on the size of the septic tank and use. We recommend having the system pumped and evaluated before purchasing the house. The company that pumps the tank may be able to determine if the leaching field has failed or is on the verge of failure. If the tank has been allowed to overflow in the past, solids may have floated into the leaching field causing it to fail, and leading to the need to have it replaced. Replacement of a leaching field is costly. 4. If a garbage disposal is present, the septic tank requires pumping more frequently. 5. In Massachusetts the septic must be evaluated to strict and comprehensive standards when a house is sold. It includes inspecting the tank and internal components (e.g. baffels), inspecting flow through the distribution box (D-Box) and into the field. The system must be plotted on a map. The ten year high water table must not come up into the leaching field/pit. The lowest part of the leaching field should be exposed for inspection. When completed, a standard state form is filled out; read the form carefully. 6. Some leaching of a septic system is completed in a pit rather than through drainage pipes. If the correct soil properties are present this type of system is fine. The leaching is simply a way to get the water back into the soil. 7. Very old waste disposal systems consist of cesspools, which is a hole in the ground usually lined with stones. All the waste is drained into the pit, and the moisture seeps out. Most of these pits have built up solids which block the drainage, thus failing to leach the water into the ground. 8. Most waste systems gravity feed, that is no pump is used to move the waste. However, if the lot does not allow this, a pump may be installed to move the waste. Typically just the fluid is pumped, the pump is located in a tank just past the septic tank. Thus the solids have been removed from the waste making for easier pumping, see diagram. These systems need to have alarms on the pump tank to indicate if the pump has failed. | ||||||||||||
|
Diagram of Typical Septic System | ||||||||||||
| ||||||||||||
|
18 | ||||||||||||
|
19 | ||||||||||||
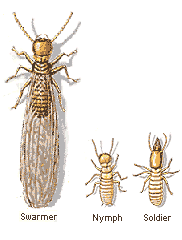
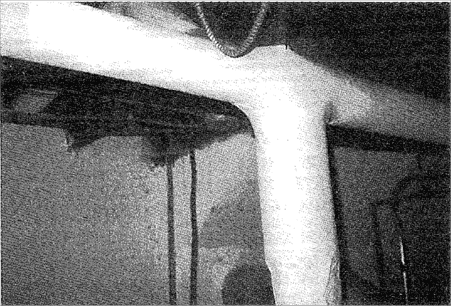
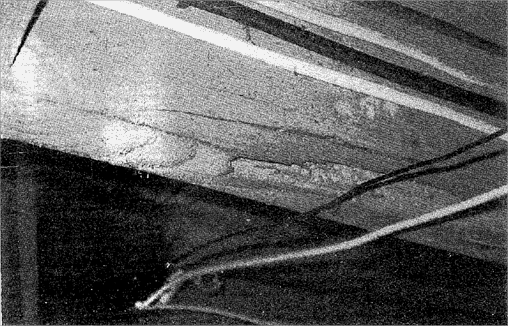
Termites | |||||||||||||
|
TERMITES/CARPENTER ANTS
1. The thought of termites and other wood destroying insects unnecessarily intimidates many homeowners.
2. Insects present much less threat than an overfused electric circuit. The insects can be destroyed by yourself or a pest control company. If necessary, the damage done can be corrected. Request information, in writing, on the hazards of any chemicals the pest control company intends to use so you may take the appropriate precautions to protect your family and pets.
3. Chemical overtreatment or mistreatment is a concern, particularly on homes previously treated (since more hazardous chemicals were previously used). In areas commonly treated for insects, testing of the home and soil for excessive chemicals is advised. For more information on local concerns, contact the community or State Health Department or a private home inspector.
4. If you observe signs of insect infestation, have a pest control company or home inspector evaluate your home. Signs of insect infestation include: a. Black ants 1/4 to 1/2 inch long in the home, see Figure below. b. Termite tubes attached to non-wood members, generally on foundation walls. The tubes are made of wood dust and dirt. c. Unexplainable small quantities of fine wood dust or "sawdust".
5. Wet wood attracts wood destroying insects. Wood within six inches of the ground is most susceptible to insects. Termites often build tubes which can extend several feet to obtain access to the wood. Termites and carpenter ants can be present with no physical signs. | |||||||||||||
 Beetle Damage | |||||||||||||

| |||||||||||||
|
Carpenter Ant | |||||||||||||
|
20 |
21 | ||||||||||||
|
MOLD
There are over 100,000 molds and some may create health issues. Mold is one type of fungus; other types of fungi are mushroom and mildew. Molds are microorganisms that grow as filamental structures and reproduce by creating spores. If the living mold is killed or dies, the spores still survive, and may be a threat until removed or encapsulated. Their food is material such as leaves, wood, paper cellulose; in other words, material your home is made of!
There are three types of mold: 1. Allergenic, such as Aspergillus, which may affect people who have allergies or asthma. 2. Pathogenic, such as Stachybotrys and Aspergillus, which can cause serious health effects, particularly in those who have compromised immune systems, infants and the elderly. 3. Toxigenic, such as Stachybotrys, which can cause serious health effects in almost anybody.
Things to look for which may indicate the possibility of mold are: 1. Visible growth on surfaces. 2. Smell (can be a musty smell). 3. Evidence of water leakage, now or previously.
There are many places that mold can grow in a home. Thus to determine if your house has molds to be concerned with, requires taking samples which are sent to a lab for evaluation. Air sample tests should be conducted in all homes (air samples give concentration of spores, not type). If evidence of mold or water leakage is seen, surface samples are needed to determine what type is present.
Conditions which promote mold growth include: 1. Relative humidity over 50% (it is critical to dehumidify) 2. Standing water, flooding (even if only occasionally) 3. Water penetration into or leakage within a basement or crawl space 4. Limited ventilation (basements, closets, items stored against the wall; anyplace air flow is restricted) 5. Appliances not vented outside, particularly dryers and bath vents
IF ANY OF THESE CONDITIONS EXIST, IT IS LIKELY MOLD IS GROWING IN YOUR HOME. SOME TYPES OF MOLD MAY CAUSE SERIOUS HEALTH PROBLEMS.
MOLD CAN BE REMOVED FROM THE HOUSE. DEPENDING ON THE TYPE, LOCATION, ETC. IT IS NOT INEXPENSIVE, OBTAIN QUOTES FROM QUALIFIED CONTRACTORS, AND CONDUCT FOLLOW-UP TESTING. |
MOLD | |||||||||||
|
Health Effects Exposure to mold is not healthy for anyone, but the following individuals are at a higher risk of adverse health effects: children, elderly, immune compromised patients, pregnant women, and individuals with existing respiratory conditions. Typically exposure occurs by inhaling airborne mold spores (reproductive bodies similar to seeds). Spores become airborne whether the mold is alive or dead. If the mold is disturbed, very high concentrations can become airborne. Physical contact with the mold can also cause serious reactions.
Protection...Testing is your first line of defense! To determine if mold is a problem, your home must be tested. Air tests would be conducted in the home, where mold is likely, and outside. Testing outside is needed to see what the "background" level of mold is in your area. Comparing the outside amount to the inside will help determine if mold is growing in the house. If the level of house mold in the air is 10 to 70% of the outside level, it indicates mold is probably not growing excessively within the home. House carpeting should be tested and any visible mold should be sampled as well.
Stachybotrys Chartarum (atra), "The greatest concern" Stachybotrys Chartarum (atra) is a greenish-black toxic mold that colonizes particularly well in high-cellulose materials, such as straw, dry wall, carpet, wall- paper, fiberboard, ceiling tiles, etc. Before it dies, it is wet and slightly slimy.
Stachybotrys produces a mycotoxin that causes human mycotoxicosis. This type of mold is thought to be a possible cause of the "sick building syndrome". Children's exposure to Stachybotrys spores are thought most likely to cause pulmonary hemosiderosis (bleeding in the lungs). The following is a list of symptoms associated with exposure to Stachybotrys mold spores. 1. Respiratory problems, such as wheezing, and difficulty in breathing 2. Nasal and sinus congestion, shortness of breath 3. Eyes burning, watery, reddened, blurry vision, light sensitivity 4. Dry, hacking cough, sore throat, nose and throat irritation 5. Skin irritation (especially after physical skin contact with the mold) 6. Central nervous system problems (constant headaches, memory problems, and mood changes) 7. Possible fever, diarrhea, aches and pains 8. Immune suppression (the longer the exposure, the greater the suppression)
Testing is the key. Remember, mold is everywhere, we are concerned if it has elevated concentrations in your home. Mold can be removed from the home; the elevated moisture levels which promoted the mold growth can be corrected.
| ||||||||||||
|
| ||||||||||||
|
22 |
23 | |||||||||||
|
WEATHERIZATION | ||||||||||||||||||||||||||||||||||||||||||||||||||||
|
WEATHERIZATION | ||||||||||||||||||||||||||||||||||||||||||||||||||||
 Energy used to heat and cool a home accounts for 55 to 70% of energy costs. Heating water is the second largest expense, accounting for 15 to 25% of the energy dollar. Much of the heat loss out of a home is from conduction through windows, walls, ceilings and floors. leakage of hot air out of the house can account for 50% of the heat loss. Air leakage on a new "tight" house is about 3 changes of inside air with outside air every hour. Older "leaky" houses have over 8 changes per hour. This means for a house with 4 air changes per hour, all the air leaks out of the home every 15 minutes. This represents a significant amount of cold air entering which must be heated. Leakage out is often from areas generally not thought of, such as light fixtures, cracks between the wall interiors and attic, massive openings over kitchen cabinets or boxed-down ceilings in bathrooms.
Many states and utilities offer energy saving programs, often at no or nominal cost. The utilities are finding it more cost effective to help you save energy than to build additional power plants.
Some energy saving tips:
1. Weatherstripping the doors and sealing the house sills and windows will reduce drafts and save energy. Do not seal storm window weep holes. 2. lnsulating the attic is generally the most cost effective insulation, providing the fastest return on your investment. 3. Insulating the walls typically costs more than insulating the attic but saves you more energy. The reason for this is that the walls have much more area exposed than the attic, resulting in more overall heat loss through the walls. 4. Most of the heat loss in well-insulated homes is through the windows. Available insulating materials for windows (e.g. insulating window drapes) can be very effective in reducing the heat loss. 5. Ventilation of the attic is critical to preventing moisture build up, which will lead to structural wood damage. Do not block attic vents during the winter. If moisture is seen in the attic during winter months, most commonly as frost on nails, your attic ventilation must be increased. 6. The damper on a fireplace should be closed when not in use. Much warm air from the home will be drawn up the chimney if the damper is left open. 24 |
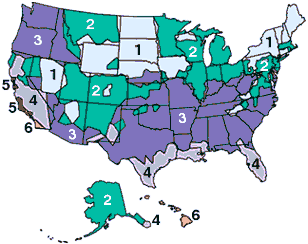 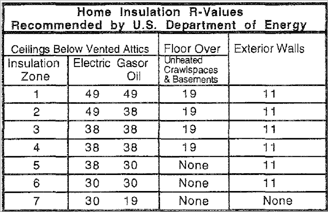
7. Seal openings, particularly on the upper floors. Flash close the openings around chimneys in the attic floor. In the attic, seal around boxed in drop ceilings such as above kitchen cabinets or bathrooms. Caution!: Some light fixtures cannot be covered; replace these with ones which can be covered. 8. Refer to the chart below for the recommended insulation R Value for your area. The higher the R Value, the more the material insulates. This R value assumes there is room, and accessibility to fit the insulation. If you stuff 6 inches of R-19 insulation into a 3.5 inch wall, you will NOT obtain an R-19 insulation value.
9. The R Values for various materials are given below.
| |||||||||||||||||||||||||||||||||||||||||||||||||||
| |||||||||||||||
|
WATER |
| ||||||||||||||
| |||||||||||||||
|
Accumulation tank | |||||||||||||||
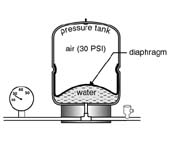
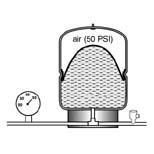
|
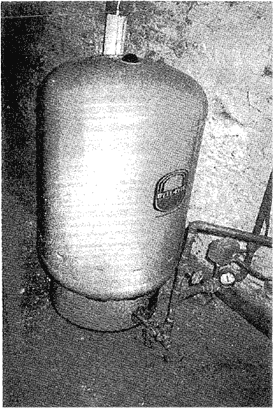
Well Systems: 1. The water tank requires compressed air to function correctly. The air will push the water through the system. If adequate air pressure is not maintained, the pump will come on more frequently and wear out sooner. This can be detected by hearing the pressure switch click on and off more often than every several minutes and also seen by quick changes in water flow at the faucets. When all the air is gone, the water flow will pulse. 2. Newer, diaphragmed tanks do not need air added. Non-diaphragmed tanks may require additional air several times a year. 3. If you find that the well pump is coming on frequently, when little or no water is being drawn, have a service company check the system. Water Quality: 1. Clean water is essential to good health. We recommend that a full standard analysis be perfomed on the well water before purchasing a home. At least test for bacteria. If any anomolies are found consult with a water expert. An elevated bacteria level can be an indicator of other problems. If unacceptable levels of contaminants are found, usually water treatment devices can be installed to remove most of the contaminants. 2. Wells do become polluted, so it is advisable to test for bacteria once a year, or if the water smells. If it smells, do not drink it until tested. 3. Some well water is treated with water softening systems. The treatment systems lower the mineral content. Typically sodium chloride was used which added a very small amount of sodium to the water. Today softening can be accomplished by adding potassium chloride. Since many people try to add potassium to their diets, the added potassium is desirable. If you have high blood pressure, heart or kidney disease, consult your physician before treating your water. 4. If one does not want to drink either of these additives, the kitchen cold water tap can be changed to bypass the treatment device. Then all drinking or cooking water can be drawn from this spigot. 5. If there is anything which you do not like about your water: taste, smell, color, fixture staining, generally a treatment system can help the problem. This is true of well water as well as municipal water supplies.
25 | |||||||||||||||
|
Water treatment, softener | |||||||||||||||
| |||||||||||||||
|
26 | |||||||||||||||
|
HEATING SYSTEMS
Hot Water Systems: 1. If you supplement your heating with wood or maintain certain cool zones in your home, the potential for freezing and breaking of heating and water pipes exists. It is advisable to have your service company add antifreeze to the system. 2. Hearing gurgling and other noises in a hot water system indicates air in the system. Have a service company bleed the air out.
Steam Systems: 1. A boiler will need water added to it periodically. Some systems need water added weekly during the heating season. Some systems have automatic filling if the water level falls too low. It is advised to manually fill these systems and use the automatic feature as a back up. The low-water-cut-off switch turns the boiler off when the water level is too low. 2. Every time water is added to the boiler, one to two pints of water should be drained from the low water cut off. This will help prevent sludge from building up and making the low water cut off fail, which often destroys the boiler and can cause a fire. 3. To control the amount of heat in a room, adjust the air bleed valve. Do not use the steam radiator shut off valve to regulate the heat.
Underground storage tanks can leak undetected into the surrounding soil, affecting ground water and, in some cases, drinking water. This contamination creates an environmental and public health hazard. Clean up and health costs can be substantial.
Tank testing can only detect leaking tanks, not predict when failure will occur. Local soil conditions generally determine the rate of tank deterioration and leakage. Many corporate relocation companies and banks are requiring buried tanks to be removed.
We recommend that buried oil tanks be removed before purchasing a property. The tanks can be replaced with above ground tanks, usually in a basement or a garage. New double walled buried tanks can also be installed with a sensor between the walls to detect any leakage from the inner tank.
| ||||||||
|
HEATING SYSTEMS
General Safety: 1. A heating system may become a SAFETY HAZARD through neglect. If the system burns fuel, it must have an adequate supply of air. If the furnace or boiler is in a room or closed area, combustion air may be drawn in through ducts, louvers or below a door. Caution must be taken never to close or restrict them. If carpeting is added, cut an equal thickness off the bottom of the door. 2. Never store materials near the system, particularly combustible materials, fluids or trash. Never, never store gasoline or propane (cooking or soldering bottles) inside the house, or in a pit, like a dug well or basement. 3. Natural gas or propane fired systems can be dangerous to light. Follow the posted directions exactly. If you are unsure, pay your gas service company to show you the proper lighting procedure; it's well worth the price. 4. If you have a water or steam system or hot water heater, it must have a pressure relief valve. The drain line from it must not be restricted, most commonly done by reducing the size of the drain pipe. If the pressure relief valve leaks water, call the service company. NEVER plug the valve.
Oil Fired Systems: 1. To run efficiently, your system needs servicing at least once yearly. The burner needs a new nozzle, a filter change and the air-fuel mixture may require adjusting. The furnace or boiler should be cleaned also. 2. Call for service if your system rumbles, hesitates to fire, or cycles on and off in less than several minutes, if you smell fuel or exhaust gas, or if dark smoke or soot is seen coming out of the chimney.
Hot Air Systems: 1. The heat exchanger separates the poisonous flue gas from the room air. Leakage of the heat exchanger is a SAFETY HAZARD. 2. Evidence of a leaking heat exchanger includes dark stains on the warm air registers, and fuel odor when the system "fan" first comes on. 3. Health reactions to a leaking heat exchanger include headaches, tiredness, and in severe cases vomiting. If you suspect a problem, have a competent service company thoroughly test the heat exchanger, not just look at it. 4. The most ignored maintenance task on a hot air heating system is changing the air filter. Generally, the filter should be changed at least once a month during the heating and cooling season. 5. We recommend that the heating system be checked by a maintenance contractor at least once a year. | ||||||||
|
27 |
28 | |||||||
|
RADON GAS
What is it? 1. Radon is an odorless, tasteless, colorless radioactive gas. Radon is created by the natural decay of uranium, and is found throughout the world in the earth's crust.
Health Risk 1. Radon exposure increases the risk of contracting lung cancer. There are no symptoms. Radon is not like toxins, viruses or pollens. If you are experiencing headaches, nausea or some other symptom, it is from something other than radon.
Does My House Have Radon? 1. All homes have some level of radon. If the level of radon is above 4 pCi/L, (picocuries per Liter), the EPA recommends follow up testing, since the level of radon varies seasonally. Corrective action is advised if the concentration is above 4 pCi/L. 2. Testing is the only way to determine if a house has an unsafe radon level. 3. The test for radon takes 48 hours. Usually a passive device is used which will require several more days for the lab to receive and analyze the sample.
What If My Radon Level Tests Above The EPA Level of 4.0 pCi/L?
1. If the Radon is elevated, it can be reduced to below 4.0 pCi/L in all homes. In most homes the radon is reduced with a sub-slab depressurization system; costs are around $1,500.00. The more difficult homes would cost more (e.g. with crawl spaces, dirt floors, block or stone foundations, etc.). 2. A home with a radon reduction system is usually much safer than one without a system. This is because a properly installed system usually reduces the levels to below 2.0 and often below 1.0. So if you have a true concern for radon, a home with a remediation system is preferred. 3. Radon reduction systems are fairly simple, consisting of a vent pipe and a blower fan. The fan runs continuously and usually consumes the same amount of electrical power as a 60 watt light bulb. 4. If you are lucky enough to have a radon system, never turn the blower off for extended periods of time to conserve electric power. Often the blower motor will fail if left off. Replacement of the blower is several hundred dollars, for this money you could run the blower for years. 5. It is advised to test for radon every fall if you have a system. The system should have a pressure gauge or an alarm to verify the fan is still operating. A test will verify everything is OK. | ||||||||||||||
|
RADON GAS | ||||||||||||||

|
Typical Indoor System
Radon blower, located in vented attic | |||||||||||||
 Typical Outdoor Installation | ||||||||||||||
|
29 |
30 | |||||||||||||
|
| |||||||||||
|
HOME INSPECTION
1. A home inspection is a visual evaluation of the condition of a home. As such, it is an information service to the home buyer which identifies the strengths and weaknesses in the structural and operational elements of the home.
2. The home inspection does not eliminate all risk to the home buyer, but a thorough inspection will reduce the risk considerably.
3. Since the inspection is a visual assessment of the house, it does not encompass items out-of-view or inaccessible. Difficulties hidden in walls or below ground cannot always be found.
4. The present condition of items is evaluated. However, due to the nature of mechanical systems, realistic prediction of future failures can only be discussed in generalities. Hot water tanks, boilers and furnaces are usually checked for leakage, but leakage could begin moments after the evaluation.
5. Friends and family members can assess certain parts of a home's condition, but a Professional Home Inspector will be much more comprehensive. The inspector has special training and the proper tools required to do a thorough inspection.
6. It is advised on the day of closing, or the evening before, that the home buyer take a quick walk through the house. This will prevent unexpected surprises and misunderstandings concerning the condition and contents of the home.
7. Home Inspectors most commonly evaluate a house prior to purchase. Most Home Inspectors also consult on home problems. Call your Home Inspector for peculiar or particular problems. This is not to suggest that only a partial pre-purchase inspection be performed. | |||||||||||
|
WOOD STOVE HEATING | |||||||||||
|
1. The main cause of wood heat problems is created by the buildup of creosote. To help prevent the buildup of creosote: a. Burn "hot". Use a thermometer to determine the temperature of the flue gases (sells for $15-$25 at wood stove supply stores). b. Do not choke off the fire at night to make it burn longer. This will cause the temperature of the flue gases to drop, resulting in creosote buildup. c. Burn seasoned wood, not freshly cut (attempt to have wood cut and split for at least 6 monthsprior to use). The more moisture there is in the wood, the more difficult it is to maintain a "hot" fire. 2. Install a smoke detector near the wood stove. Local fire departments can assist the homeowner in determining where to install the detectors. 3. Check frequently for creosote buildup in the stove pipe and flue. In the beginning you may want to check every week to verify there is little or no creosote buildup. Cleaning once or twice a year may be adequate once you become familiar with burning in the correct temperature range. 4. Use of a wood stove is not recommended if you have an old, unlined chimney. The chimney can be lined, in most cases, with a stainless steel liner. The liner will make the chimney as safe as a newly built chimney for wood stove use. 5. A new type of wood stove burns pellets of processed wood. These are very efficient units with automatic feeds, allowing for over 24 hours of burn with no tending. Many of these units can be direct vented outside, that is with no chimney running up the side of the house. The direct vent can save much of the installation costs of a conventional stove and lends flexibility in locating the stove.
Alarms & Monitors (Low/High Temperature & Security)
The technology in monitoring systems and alarms is rapidly progressing. Systems can be installed not only to sound an alarm, but can also call designated numbers to inform people that a problem exists. Some systems can call different people responsible for various risk situations, thereby saving you money. Some systems will give you temperatures of separate monitored locations. These are particularly useful for second homes. Having a professional monitoring company, that the system calls when an alarm is tripped is highly recommended since they are monitored 24 hours per day. | |||||||||||
|
31 |
32 | ||||||||||
|
MAINTENANCE-EMERGENCIES | |||||||||
|
Everyone in your home needs to know emergency procedures, what do they do incase of.... Fire escape planning is basically GET OUT ASAP, do not gather belongings. If one smells gas GET OUT ASAP AND DON'T TURN ON ANY LIGHT OR TOUCH A PHONE. For other emergencies everyone in the house needs to know where shut offs are and how to operate them. They must be readily accessible and if a tool is needed to operate them (eg older water shut offs) one needs to have a tool right there to use. These Include: 1. The main water shut off 2. The main electric shut off 3. The power off for the heating system 4. The outside gas shut off All emergency procedures cannot be anticipated so the response cannot be definatively determined. In other words people will have to make split second decisions. The number one thing that needs to be stressed to EVERYONE, including yourself, is that everone is safe, do not put anyone at further risk. An example is if there is a stove top burner that is sparking, one may choose to go into the basement to shut off the power (the main turns off lights too!!!! -have the range clearly marked), but if the sparks have started a fire, do not enter the basement unless there is another way out of the basement which would be safe to exit from. Drive this into everyones head:
is to get everyone out of the house safely!
do not put your self in danger, do not take time to get "stuff". Different directions are needed of course based on the age and capability of the people in your home. Pre-planning can literally save your loved ones lives. Smoke detectors thoughout the house (with fresh batteries) are essential. Preferably in every bedroom, hallway on each floor and expansive areas; all mounted on ceilings, away from walls. Hardwired (run off electrical power) with battery back-up is recommended. Carbon monoxide detectors are also recommended. Your local fire department is a great source of guidance on any of these questions, call on their busness line or stop in, DO NOT TIE UP THEIR EMERGENCY LINE FOR A GENERAL QUESTION, BUT DO NOT HESITATE TO USE THE EMERGENCY NUMBER - WHICH ALL IN THE HOUSE SHOULD KNOW - (USUALLY 911) IF ONE THINKS THERE IS A PROBLEM. Very young children have called 911 and saved lives. |
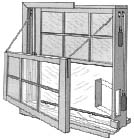
MAINTENANCE-OLD WINDOWS Replacement of the sash cord - the cord which holds the counterweight in the wall cavity allowing the window to stay up when you open it. These cords wear out, fray and break. The procedure is not overly difficult. Study the diagram below to understand how the system works and how it is assembled.
STEP 1. Remove the stop strips which hold the top window sashes in. It will be either nailed or screwed in (Hint: if it is painted cut along and through the edge of the paint with a razor. Use a flat chisel to ease the wood out if it is nailed). CAUTION: the top window sash is free to fall out, if the cords are broken the window may fall out. The upper window stop strip is usually nailed and can be a challenge to pry out. STEP 2. Disconnect the window sash cords if they are not broken, one at a time, being careful to hold the cord and gently lower the weight in the cavity. STEP 3. Remove the access panel, usually a single screw holds it, and remove the weight from the cavity. It will be heavy, half the weight of the window. STEP 4. Measure the proper length of new rope (measure both peices of rope if it had been broken) and mark the new rope with a magic marker, feed the rope into the pulley and down, attach to the weight. Place the weight back in the cavity (rope side up) and pull the cord to take up the slack. Cut the cord and attach it to the window as before (usually a knot with a nail through it). STEP 5. Reassemble. Note some windows have chains rather than rope and often these can be mended together with a sturdy steel wire.
| ||||||||
|
| |||||||||
| |||||||||
|
MAINTENANCE- Pointing Mortar | |||||||
|
MAINTENANCE- ELECTRICAL | |||||||
|
Resetting Circuit breakers: Most you move to the Off position, then to the On position (see ON/OFF labeling on the breakers. If the Breaker trips off immediatly or will not reset, it is a problem and you need to call an electrician.
Blown Fuses: You can usually see that the "wire" strip inside the glass fuse has burned through, opening the circuit. Often the glass looks scorched, has a black or brown color inside. Simply unscrew the fuse, just like you would a light bulb, and replace it with the same size fuse. The fuse blew because it was overloaded, it protected the wire from overloading (heating up and catching your house on fire). Do not increase the size of the fuse!
Keeps tripping off: This indicates an overload on the circuit. See what was on at the time, things that generate heat draw the most current. See if you can plug those things in at other outlets, if this is not practicle, have an electrician "break up" the circuit (put the outlets on different fuses or breakers).
Loose Plug Fit: Indicates a warn recepticle and should be changed immediately. A loose fit can cause heat buildup and arcing, both commonly cause fires. New construction requires Arc Fault Interrupt protection in all bedrooms, since many fires in these areas originate from arcing.
Covers: All electrical boxes must be covered. The covers are intended to contain a fire should one occur. Covers also help prevent electrical shocks
|
Pointing is replacement of mortar. The old mortar has deteriorated due to age, poor original mix, and/or water exposure. Some times there are no structural properties left to the original mortar, it scrapes out as sand would. We have seen chimnies which have gotten to the point that the mortar turned to the sand consistency and fell out over time so that the chimney bricks had virtually no mortar between them. Fortunately most are not this bad, they can be pointed rather than totally rebuilt.
The old mortar is removed in 1 1/2 inch, the bricks wetted (to avoid premature drying of the mortar before it is properly set). Then new mortar is packed in and as it begins to set (harden) the surface is tooled, also called striking. This helps avoid water entry, extending the life of the job and making it look good. The edges of the mortar should be flush with the outer edge of the brick or block. Some will strike the mortar in from the edge to create more contrast, unfortunately it leaves a path for water to enter, thus leading to early failure.
All masonry needs to be crowned to avoid water entry. The crown needs to be thick enough that it does not crack easily - several inches is recommended. A long area, such as a wall, needs joints so as to avoid cracking. The joints are sealed with an elastomeric material, like a caulk. Similarly a crown on the chimney needs a gap between it and the flue liner, this allows the flue liner to move up. The crack is then sealed with a caulk to allow motion, yet maintain a seal. Without the gap the flue liner will often lift the top of the chimney. We often see crown and the top two courses of bricks permanently lifted, resulting in a broken mortar joint around the chimney. | ||||||
|
MAINTENANCE-Squeaky Wood Floors |
MAINTENANCE-Running Toilet | |||||||
|
The first step is to determine what is causing the squeak. If the floor is visible from below, have someone walk on the floor and observe from below. Look for motion, if it's not seen when the noise is heard, it is likely between the subfloor and the top floor. Two methods are popular to correct this. One is using an angle iron, see figure 1. Attach the angle iron to a joist, about 1/4 inch below the floor. Drill a pilot hole through the subfloor and partway into the floor. Use a wood screw (lubricate with soap) to draw the floor down. Several brackets may be needed. Another method, which is used if the squeak is far from a joist, is simular, but you use one screw with a large washer (like 1 inch in diameter and 1/8 inch thick) - See figure 2. Again, predrill the hole a little smaller diameter than the screw. If the noise is from the subfloor to the joist, you may be able to inject construction adhesive in the gap, or use the angle bracket method. Cross-bracing is the most straightforward one to fix; reattach the bracing by screwing and/or with construction adhesive. Floors which you cannot see from below will be more difficult. Locate the area, predrill holes at an angle (drill 3/4 of the diameter of the nail) and nail with a ribbed nail. If a load can be applied to the area (i.e. have someone stand on the loose area) it will make the repair better. Drive the ribbed finishing nail in and set it. |
The first thing to do is to chain the toilet to the floor so it does not get away, Ha Ha. Really, you need to determine why the toilet runs. Often if you wiggle the handle the running water in the bowl will stop. If this is the case, the fix is usually easy. Remove the cover and check the connection between the handle arm and the rubber seal. Flush the toilet and observe what is hanging up, make appropriate adjustments to correct. Often a chain is catching on the arm or on the rubber seal. If everything looks OK and the water still runs into the bowl, even when the flush lever is wiggled, check to see if the water level is too high, running into the overflow tube, see figure below. To correct on newer units adjust the float ball by turning the screw, often a label is present identifying which screw to turn. On older toilets you may have to gently bend the lever to the float ball. When the tank is full, if the water level is below the overflow tube then it is likely that the rubber seal is worn and will need to be replaced. | |||||||

| ||||||||